Below you will learn how to configure in Desktale an Email-type channel, which you can use for:
- gathering and managing in Desktale tickets or messages addressed to a mailbox you own (input);
- sending your reply messages (output) directly from Desktale.
For each mailbox for which you want to activate the link with your account in Desktale, you must create a specific Email channel.
First, click on to access the Setting section; then clicking on Channels your list of channels (which will initially be empty) will appear.
Create
To start creating a channel of Email-type, first set the Channel type field to Email, and then access the following settings.
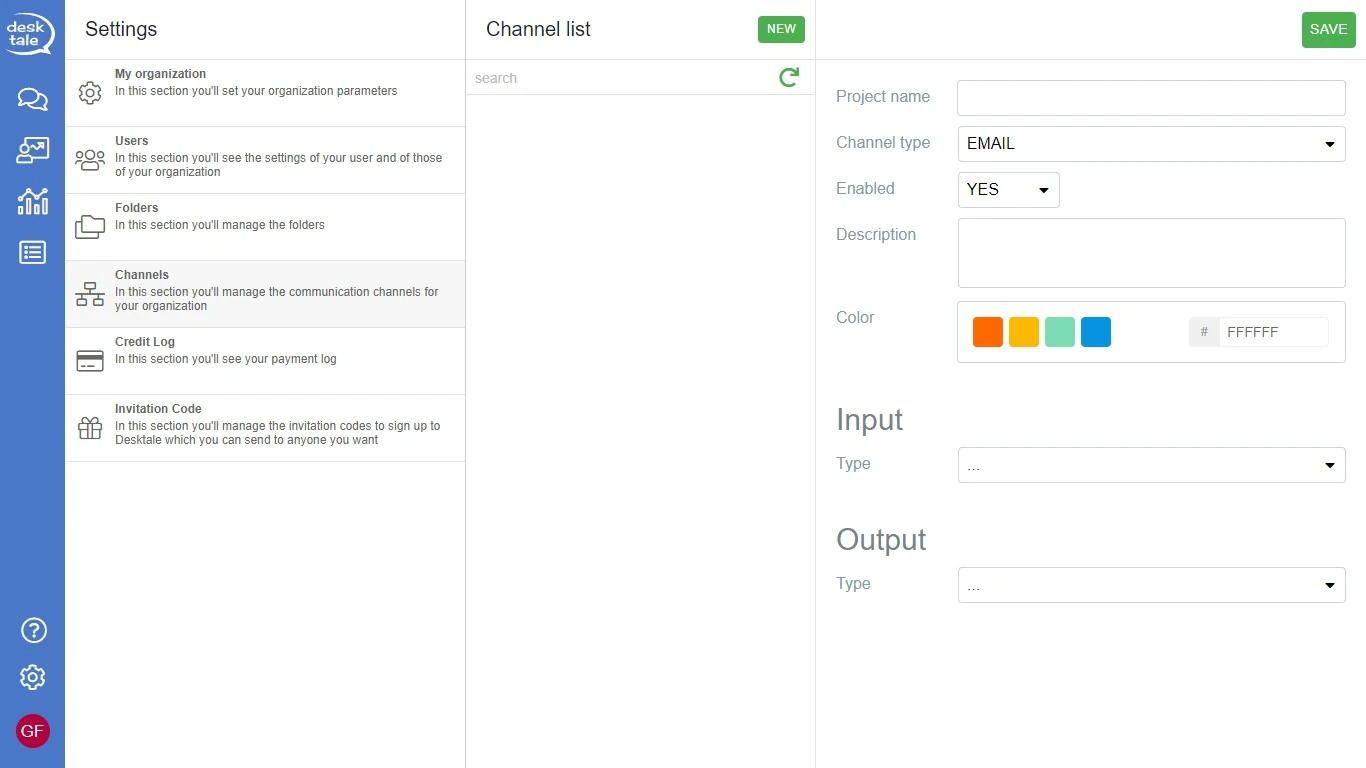
Two sections will appear for you to fill in:
- Input;
- Output.
Input
Click on the Type field to choose which of the following methods/services you want to link your mailbox to (for the input-receive phase):
- POP;
- POPS;
- IMAP;
- IMAPS.
POP
By setting the value of the Type field to POP, the following fields will appear to be filled in:
- Username;
- Password;
- Host;
- Port;
- Report error to;
- Assign to.
If you have configured the POP service on your own server, and used a different port, fill in the Port field with the port number used on your server.
In the Report error to field you can enter all the emails, separated by semicolons, to which you want to send any error reports during the POP or IMAP reading.
The Assign to field is used to decide which queue (a user or folder) to assign tickets arriving on Desktale via this method/service; by default they will be assigned to the Super Administrator.
Once you have filled in the fields, proceed to verification by clicking on CHECK POP CONNECTION; if there are any errors, you will be notified of the cause with or .
In this section, you can clearly see the warning, which you should keep in mind, informing you that choosing the POP or POPS option will result in the automatic deletion of all emails read or downloaded via Desktale from the indicated email inbox (All emails read with POP3 will be deleted from this email account).
Even if the POP connection check feature fails on the spot, you can still save the data in the meantime and try the test again later.
POPS
By setting the value of the Type field to POPS, the following fields will appear to be filled in:
- Username;
- Password;
- Host;
- Port;
- Report error to;
- Assign to.
If you have configured the POPS service on your own server, and used a different port, fill in the Port field with the port number used on your server.
In the Report error to field you can enter all the emails, separated by semicolons, to which you want to send any error reports during the POP or IMAP reading.
The Assign to field is used to decide which queue (a user or folder) to assign tickets arriving on Desktale via this method/service; by default, they will be assigned to the Super Administrator.
Once you have filled in the fields, proceed to verification by clicking on CHECK POP CONNECTION; if there are any errors you will be notified of the cause with or .
In this section, you can clearly see the warning, which you should keep in mind, informing you that choosing the POP or POPS option will result in the automatic deletion of all emails read or downloaded via Desktale from the indicated email inbox (All emails read with POP3 will be deleted from this email account).
Even if the POP connection check feature fails on the spot, you can still save the data in the meantime and try the test again later.
IMAP
Setting the value of the Type field to IMAP the following fields to be filled in will appear:
- Username;
- Password;
- Host;
- Port;
- Report error to;
- Assign to.
If you have configured the IMAP service on your own server, and used a different port, fill in the Port field with the port number used on your server.
In the Report error to field you can enter all the emails, separated by semicolons, to which you want to send any error reports during the POP or IMAP reading.
The Assign to field is used to decide which queue (a user or folder) to assign tickets arriving on Desktale via this method/service; by default they will be assigned to the Super Administrator.
Once you have filled in the fields, proceed to verification by clicking on CHECK IMAP CONNECTION; if there are any errors you will be notified of the cause with or .
In this section, you can clearly see the warning, which you should keep in mind, informing you that, with this method/service, if your Organization, or whoever on its behalf, were to manually log in over time to the mailbox listed here before the periodic Desktale login and put certain email messages in the read status, these same messages will not be readable by Desktale and thus will not be made available in your account in Desktale.
IMAPS
Setting the value of the Type field to IMAP the following fields to be filled in will appear:
- Username;
- Password;
- Host;
- Port;
- Report error to;
- Assign to.
If you have configured the IMAPS service on your own server, and used a different port, fill in the Port field with the port number used on your server.
In the Report error to field you can enter all the emails, separated by semicolons, to which you want to send any error reports during the POP or IMAP reading.
The Assigned to field is used to decide which queue (a user or folder) to assign tickets arriving on Desktale through this service; by default they will be assigned to the user who created the organization
Once you have filled in the fields proceed to verification by clicking on CHECK IMAP CONNECTION; if there are any errors you will be notified of the cause with or .
In this section, you can clearly see the warning, which you should keep in mind, informing you that, with this method/service, if your Organization, or whoever on its behalf, were to manually log in over time to the mailbox listed here before the periodic Desktale login and put certain email messages in the read status, these same messages will not be readable by Desktale and thus will not be made available in your account in Desktale.
Output
Let’s now proceed to define the section on the Output phase.
Click on the Type field to select one of the following items:
- SMTP;
- SMTPS.
The procedure for completing the output section is not bound to the completion of the input section; therefore, the definition of the output stage is not relevant to the choices made in relation to the input stage.
SMTP
By setting the value of the Type field to SMTP, the following fields will appear to be filled in:
- Email;
- Username (optional to connect with the service):
- Password;
- Host;
- Port: is defined by the system, but is customizable.
Once you have filled in the fields, proceed to verification by clicking on CHECK SMTP CONNECTION; if there are any errors, you will be notified of the cause with or .
Even if the connection check feature fails on the spot, you can still save the data in the meantime and try the test again later.
SMTPS
By setting the value of the Type field to SMTPS, the following fields will appear to be filled in:
- Email;
- Username (optional to connect with the service):
- Password;
- Host;
- Port: is defined by the system, but is customizable.
Once you have filled in the fields, proceed to verification by clicking on CHECK SMTP CONNECTION; if there are any errors, you will be notified of the cause with or .
Even if the connection check feature fails on the spot, you can still save the data in the meantime and try the test again later.
Copy
After you have created at least one Email channel, it will be possible to copy the configurations for input (POP, POPS, IMAP, or IMAPS) and output (SMTP or SMTPS) for other channels, both new channels and old ones already created.
Within the drop-down menus of the input and output fields, you will see the option Copy from: channel_name.
Click on the channel from which you want to import the information for both the input and output phases; the fields will fill in automatically, except for the password (which must of course be re-entered).
SPF record
An SPF (Sender Policy Framework) record identifies one or more mail servers and/or one or more domains allowed to send email on behalf of your domain.
Most Internet Service Providers (Aol, Mail.com, Hotmail, Gmail, Microsoft, Yahoo!, Aruba, and many others) use SPF records to verify the authority of the email they have received.
Receiving mail services check your SPF record to verify that incoming messages were actually sent by you through servers authorized by you.
How it works
Let’s take a practical example of configuring the SPF function with Gmail; when sender@miodominio.com sends an email to recepient@gmail.com the Google mail service queries the DNS of mydomain.com to see if there is a DNS record showing that the IP address of the server that sent the email was actually authorized to send it on behalf of miodominio.com.
Pro
Configuring the provider-side SPF feature allows you to significantly increase deliverability when using DeskTale’s service together with your outgoing mail service (SMTP or SMTPS).
Con
Failure to perform the above SPF configuration, on the other hand, increases the risk, when being read by the receiving provider, that your emails will end up in your recipients’ SPAM folder.
Configuration
The servers used to send email in Desktale use the following IP addresses:
- 185.56.11.38;
- 185.56.11.204.
Ask whoever manages the DNS of the domain associated with your emails (or at least a qualified technician you trust) to add or change the SPF record associated with your domain so that the IP addresses listed are present.
Example
Google
Below is an example of SPF Record configurations if your mail provider is Google:
- v=spf1 to mx ip4:185.56.11.38 ip4:185.56.11.204 include:_spf.google.com ~all.
Aruba
Below is an example of SPF Record configurations if your mail provider is Aruba:
- v=spf1 to mx ip4:185.56.11.38 ip4:185.56.11.204 include:_spf.aruba.it ~all.
Save
When you have completed the configuration, click on SAVE to confirm the information entered.
To view and recheck the information of the newly created channel, click on .
Delete
To delete the channel, select it in the Channel list, then, click on DELETE to delete it.